Setting up a Nuxt Blog with Netlify, Netlify-CMS and Netlify Identity.
· ☕️️ 5 mins read
1. Github account
First you need to publish the repository to Github. So If you don't have a Github account yet, go create one.
2. Template
If you are using Nuxt, any template will do the job. Remember to hide anything you don't want to be published in the .gitignore first (check mine, for example).
I used this one as inspiration. I would recommend to use it for the scaffolding:
https://github.com/renestalder/nuxt-netlify-cms-starter-template
3. Connect with Netlify
Ok, now that our site is published (check mine for instance), let's link it to Netlify, so we get to do the deploy job from there:
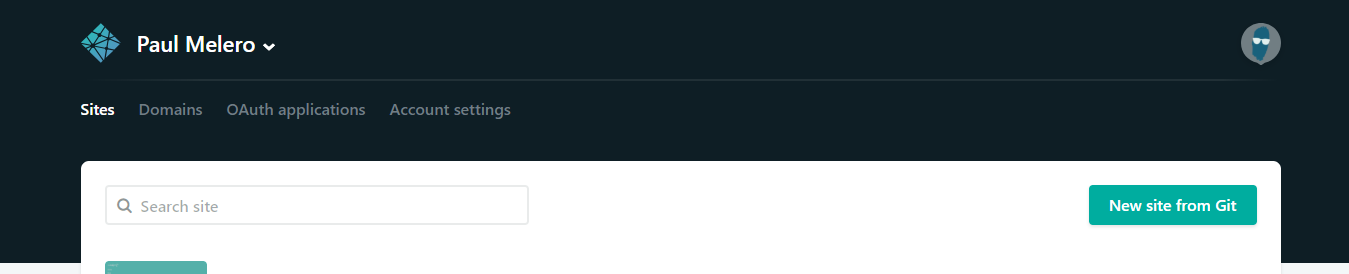
See the "New Site from Git" button? From there, Netlify will make us browse our repositories from Github and we have to choose our Blog repository.
The default commands for getting a Nuxt site up and ready are:
npm run generate(for generating a static site, which is the one we want).- (Or
npm run build && npm startfor the SPA mode. But not in this case.)
It will also ask us to specify the folder from where we are serving. It's dist for our Nuxt sites.
4. Add Netlify CMS
Ok, now let's add the CMS capabilities: Enters Netlify CMS.
With their own Headless CMS implementation we will be able to add "posts" to our blog and store them on our Github account. Specifically the route will be specified in our netlifyCMS config file. It would look something like this:
backend:
  name: github
  accept_roles: #optional - accepts all users if left out
    - root
  repo: 'gangsthub/graficos.net'
media_folder: 'static/images/uploads' # Media files will be stored in the repo under static/images/uploads
public_folder: '/images/uploads' # The src attribute for uploaded media will begin with /images/uploads
collections:
  - name: 'blog' # Used in routes, e.g., /admin/collections/blog
    label: 'Post' # Used in the UI
    folder: 'content/blog/posts' # The path to the folder where the documents are stored
    create: true # Allow users to create new documents in this collection
    slug: '{{year}}-{{month}}-{{day}}-{{slug}}' # Filename template, e.g., YYYY-MM-DD-title.md
    format: 'json'
    fields: # The fields for each document, usually in front matter
      - {label: "Lang", name: "lang", widget: "string"}
      - {label: "Title", name: "title", widget: "string", tagname: "h1"}
      - {label: "Publish Date", name: "date", widget: "datetime"}
      - {label: "Featured Image", name: "thumbnail", widget: "image", required: true}
      - {label: "Body", name: "body", widget: "markdown"}
      - {label: "SEO Description", name: "description", widget: "text", required: true, pattern: ["^.{50,300}$", "Must be within 50 and 300 chars"]}
As you can see in the collections.folder property we specify the path. We can define as many collections as needed for different posts or pages.
The accept_roles option is also important because it's related to the admin side of the CMS which we are going to enable in a bit.
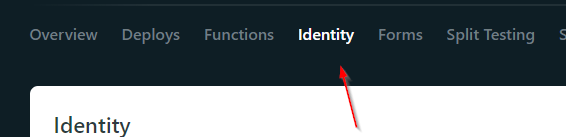
5. Configure Netlify Identity (Auth)
Within the Netlify platform, we need to enable Identity, one of its crown jewel features. You will see it in the dashboard menu:
On the Site settings it is also mandatory:
- to enable the Git Gateway (On the identity instance, if I am not wrong), so both platforms can communicate:
https://app.netlify.com/sites/<YOUR SITE>/settings/identity#git-gateway
- and to set up my users. In this case, I only have one user with the
rootrole.https://app.netlify.com/sites/<YOUR SITE>/settings/general
- also, enable OAuth in user settings:
https://app.netlify.com/sites/<YOUR SITE>/settings/access#oauth
Remember that Netlify CMS is going to look for the config.yml we were talking about. So if you are using Nuxt.js, place it somewhere like under static (that folder contents gets copied to the root of your page when you generate the static version).
You need also to add your Identity entry point. In my case (full disclosure) is/static/admin.html. And place there the netlify-cms.js external link as described in the documentation.
6. Preview Deploy
Ok, push your changes to see under deploys a preview deploy of that entry point.
Nice!
7. Generate Custom Routes with Dynamic Content
Last but not least, checkout how to generate your blog routes dynamically:
// nuxt.config.js
import globAll from 'glob-all'

const blogPostRoutes = getRoutesFromPosts({
  '/blog': 'blog/posts/*.json',
})

/**
 * Return a path from glob
 * @param {*} urlFilepathTable
 */
function getPathFromGlob(urlFilepathTable) {
  return [].concat(
    ...Object.keys(urlFilepathTable).map(url => {
      var filepathGlob = urlFilepathTable[url]
      return globAll.sync(filepathGlob, { cwd: 'content' })
    })
  )
}

/**
 * Create an array of URLs from a list of files
 * @param {*} urlFilepathTable
 */
function getRoutesFromPosts(urlFilepathTable) {
  return getPathFromGlob(urlFilepathTable).map(
    articlePath => `/blog/${path.basename(articlePath, '.json')}`
  )
}

module.exports = {
  ...
  generate: {
    routes: blogPostRoutes,
  },
  ...
}
And also, check how to create dynamic routes on Nuxt.
I'm leaving my blog OS, so you can always check how I did it on my repository.
Thanks for reading! 😋😊